
If you’re here for expert advice, you’ll be sorely disappointed, but if you want a basic tried and true lesson with tips and tricks? Stick around. I am by no means the person who should be giving advice, but still I’ve had so many people ask for it and finally decided to pull it all together in one place. So this is your crash course introduction to Sourdough. I will link my very favorite recipes (with my own notes) and the best (and worst) advice I have received while on this journey.
So let’s begin with the biggest sourdough secret (from my friend Raquel): it’s not that serious.
I’ll share with you some of the most shared “rules” and I’ll share with you things that I have done differently, some of those things have worked well, some of them have failed and I realized you do have to follow a couple of the rules, but it’s true, sourdough isn’t that serious and there’s so much room for you to mess up and be okay. I can’t tell you how many times I’ve forgotten about my starter and she’s been fine, but we’ll get to that.
Words to Know:
Starter: simply put, it’s live culture of flour and water which is why so many of us refer to it as a living thing, because it’s live. You use a portion of it to make your dough.
Feed: when you add water and flour to your starter you are feeding it since it’s a living thing.
Discard: some people take a portion of their starter and get rid of it before each “feed”. I do not do this. You can save the “discard” and use it for recipes, but for time sake I just use my starter for everything.
Ratio: the amount of water to flour that you use when feeding your starter. Some people get REALLY scientific about this, you’ll see terms like 1:1:1.
Bulk Fermentation: The time from when you finish mixing your dough, until you finally shape it.
Stretch and Folds: a processes in which you take the dough and literally stretch and fold it. You are NOT kneading it. That is important to note. Some people do these religiously 4 – 5 times during the bulk fermentation time, I do it typically twice because I’m busy.
Banneton or proofing basket: I’ll link my favorite one, but this is where your bread will take a rest and get it’s shape.
Score: This is an absolute must. You basically cut into the dough once it’s been shaped. I don’t know the science behind it, but if you don’t, as it’s baking, it will make a hole for itself. It doesn’t have to be fancy.
Open Bake: There are two ways to bake sourdough, one way is in a dutch oven (linked below) another way is
What You Need (*shopping list linked*):
- All purpose flour (unbleached is supposedly best, but I use bleached)
- DISTILLED water (this is actually important if you don’t have filtered water)
- Unbleached coffee filters (and a rubber band to go with it)
- wide mouth mason jar
- Banneton or proofing basket (see list for my favorites)
- Scoring tool (trust me, this is a need)
- Starter (the easiest way to do this is to get some from someone else, but I’ll link a booklet below where you can find instructions on how to make your own.
- Parchment paper that can withstand temps of 450 degrees.
- Sheet pan
- Thermometer
What You May Want:
- Sourdough Booklet
- Flour Duster
- Dough Cutter
- Big “trash” bowl
- Shower caps (to cover your dough while it’s fermenting)
- Sharp bread knife
- Cake stand (this is the best way I’ve found to store my sourdough goods).
- Dutch Oven
The Nitty Gritty:
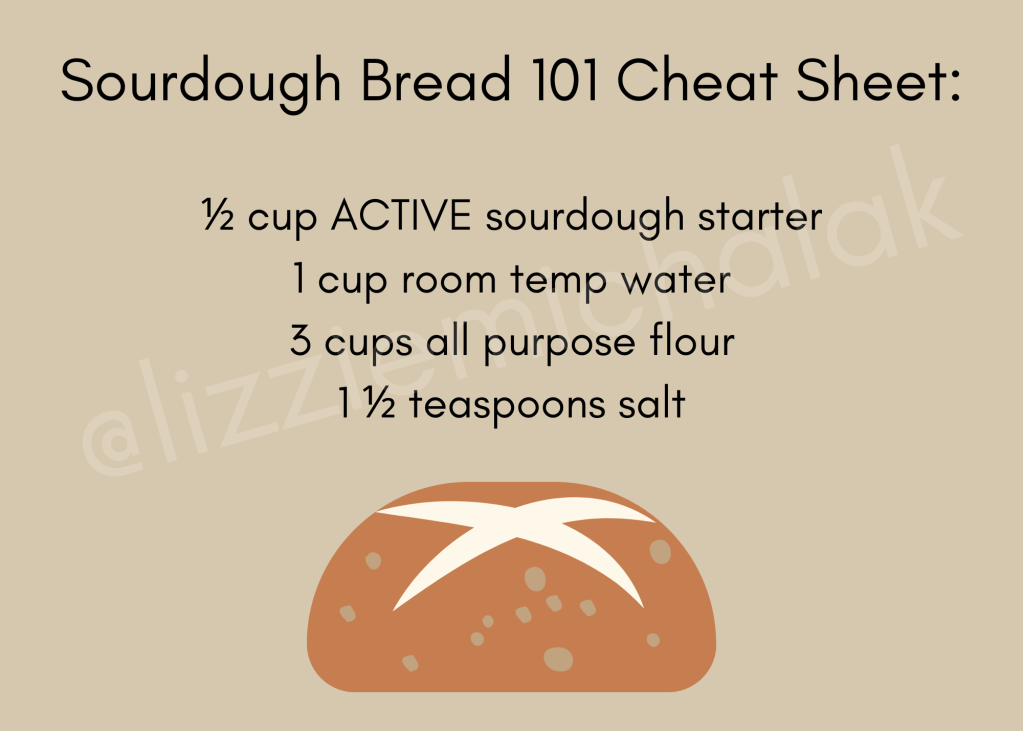
Making Bread 101: This “no stress” packet is my best friend from The Prairie Homestead. I have read it so many times. I have taken things from her packet and made them my own, but I want you to be able to read the 101 right from the source. Below I’ll share my cheat sheet for you in case you need something quick.
Bread Making Time Cheat Sheet: When I started doing sourdough the teacher of the class I took gave me a little note to bring home with the details on what to do with the loaf I was sent home with. It was so incredibly helpful that I wrote up and entire sheet for myself with all the different times that I may need. Below you can find a copy ready to use and print.
The Best Tips & Tricks:
- Always keep 1/2 cup of sourdough starter in the freezer in case you accidentally ruin yours. It is a great back up.
- The fridge is your friend. If you need a break from feeding your starter, put it in the fridge to only feed once a week, or in the freezer to pause feeding all together.
- On the flip side, when you “wake up” your frozen sourdough, just know that it needs some TLC. You have to feed it daily for a bit and then just when you think it’s a goner, it will come back to life.
- Throw out the scale and use measuring spoons. It’s not that complicated. You don’t need it.
- Seriously buy that flour duster. I’ve wasted a lot less flour using it.
- You’ll know you’ve mixed enough flour and water into your starter when it has a pancake batter like texture to it.
- That brownish liquid that sometimes separates and gets on the top of your sourdough? That’s hooch. Dump it off and keep going. Then google a video of a guy who drank it and laugh.
- If you think you see mold, get rid of it and start over. It’s not worth risking. I promise you it’s not worth it.
- When in doubt, just ask a friend (or shoot me a DM). Don’t post online about I joined a group when I started and that group grew to over 1 million people and the opinions are WILDLY different.
- Before you take the bread out of the oven make sure that it is between 200 and 205 degrees.
- Wash your starter jar (when it needs it) in COLD water. That is a key that I learned later on and has been a game changer for me.
My Favorite Recipes:
Sourdough English Muffins: Fresh April Flowers Recipe
Sourdough Bagels: Farmhouse on Boone Recipe
Sourdough Chocolate Chip Cookies: Simplicity and a Starter Recipe
Sourdough Breadsticks: Homemaker in Me Recipe
Sourdough Pancakes: Tastes of Lizzy T Recipe
Sourdough Scones: Little Spoon Farm Recipe
Sourdough Cheddar Fish: Foragers of Happiness Recipe
I think this is by far, the longest post I’ve ever written on here and I didn’t even cover everything. I will have comments on and my DM’s are open in case you are still confused on anything in particular. This is one of my current favorite topics and I am always baking, so now it’s your turn. Let go of your fear, get ready to bake and go.

Leave a comment